On this page
To film a two-person conversation that cuts together clearly, establish where the people are, keep their looking directions understandable and record enough coverage to follow the exchange. Good coverage gives you choices without making the audience work out the room again after every cut.
You can practice this with one camera and two volunteers. A small scene is enough: one person wants to leave, the other asks them to stay, and a cup or notebook gives them a simple action. The exercise below is designed practice, not a report from a professional film production.
This guide focuses on screen direction, eyelines, shot size and continuity. Equipment matters, but a coherent plan usually helps more than adding another camera before you understand where it should stand.
Define the scene before defining the shots
Write down what changes during the conversation. Someone might learn new information, become uncomfortable or decide to help. That change tells you when a closer shot or a reaction is useful.
A conversation is not simply a sequence of people taking turns speaking. Listening can be the most important action. If one person hears something difficult, their reaction may matter more than the speaker’s mouth moving.
Choose a simple physical arrangement. For a first exercise, seat the two people across a small table and keep them there. A scene in which both people continually move creates changing relationships that are harder to plan and repeat.
Confirm permission from the people taking part and the location’s owner where needed. Use a quiet place and remove avoidable noise sources. Pixanded’s interview-audio guide explains why clean sound deserves attention before you begin collecting camera angles.
Establish an axis of action
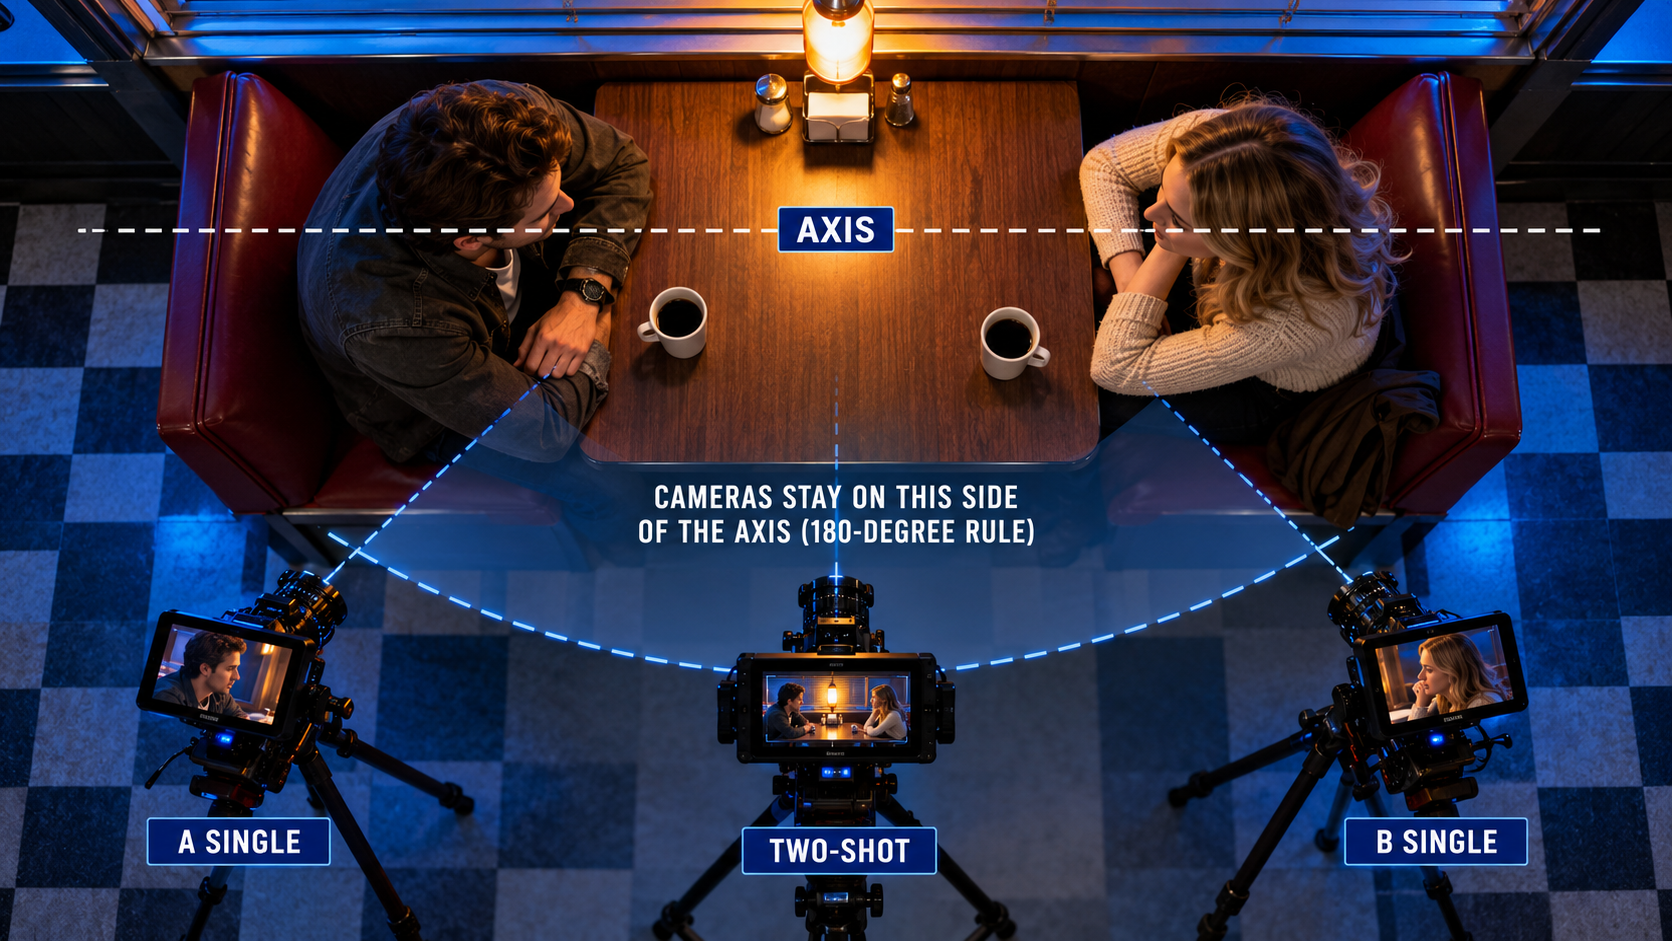
Imagine a line connecting the two people. For a straightforward shot–reverse-shot exchange, keep the camera positions on one side of that line. This is the familiar 180-degree continuity guideline.
If the wide shot places one person on the left looking right and the other on the right looking left, the closer shots should preserve an understandable relationship. It is the direction within the image that helps the audience read the exchange.
Tom Barrance’s 180-degree and eyeline lesson explains this relationship and shows how opposite looking directions support shot–reverse-shot editing. The practical lesson is to plan camera positions around the established axis before moving the camera between takes.
Do not interpret the guideline as a rule that the camera must never move or the scene must remain visually dull. It is a way of keeping geography readable. If you change the relationship, show the audience how it changed rather than accidentally contradicting the previous shot.
Eyeline is more specific than “look toward the other actor”
The eyeline is the direction and height of the person’s gaze. StudioBinder’s continuity-editing guide explains why both horizontal direction and vertical relationships matter. A person looking at someone standing above them should not suddenly look downward in the reverse angle without a reason.
Keep the off-camera actor near the position that preserves the intended gaze. If they move next to the camera to help with dialogue, check whether that changes the on-camera person’s eyes too much. Small position changes are particularly noticeable in close shots.
Leave suitable looking space in the composition. A face pressed against the edge it is looking toward can feel constrained; that may be intentional, but it should serve the scene. Begin with comfortable space and change it deliberately if the emotional beat calls for it.
Camera height is part of the relationship too. Record the approximate eye height and camera position for each angle. When one actor is seated and the other stands, the gaze directions should reflect the height difference rather than simply making both frames look symmetrical.
For a documentary or interview-style conversation, prioritize natural listening over rigid theatrical marks. You can still plan the axis and camera positions, but do not ask a real participant to repeat an emotional reaction as if it were spontaneous footage.
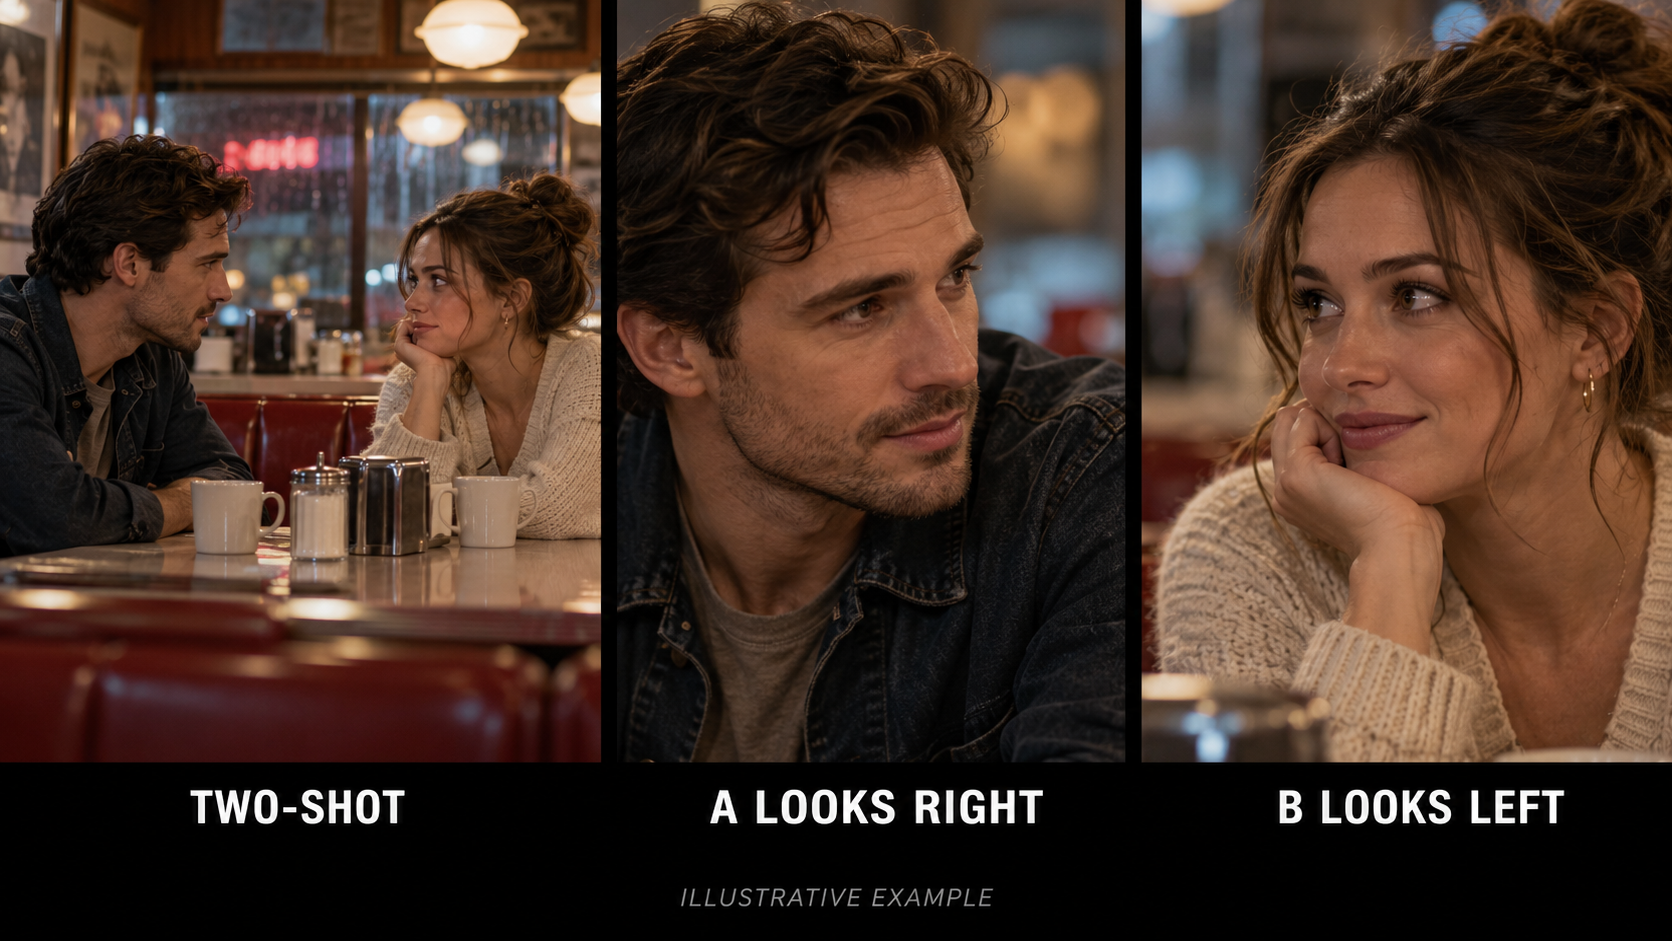
Start with four useful kinds of coverage
A two-person wide or medium-wide shot
This establishes the relationship and the environment. Record a usable full pass of the scene if possible. It gives you a reference for timing and a fallback when closer takes have a continuity problem.
The framing should show what matters. If the cup is part of an important action, include it. If the scene depends only on faces and dialogue, a very distant wide may add little beyond the opening context.
A medium shot or close shot of person A
Choose a position on the planned side of the axis. Frame the speaker with the intended looking direction and enough room for necessary movement. An over-the-shoulder view can retain a visual connection to the other person, but the foreground shoulder should not obscure the important expression.
A matching complementary view of person B
“Matching” does not mean identical geometry in every detail. It means the shots feel like parts of the same encounter. Check eye height, apparent distance, background direction and looking space. If one person appears much closer or more dominant, decide whether that is intentional.
An insert or cutaway with a purpose
A hand closing a notebook, an untouched cup or a glance at a door can reveal information or help shape an edit. Record it because the scene needs it, not because every production is supposed to have a fixed number of B-roll clips.
| Shot | Main job | Check before recording |
| Two-person view | Establish relationship and geography | Both people and relevant actions are readable |
| Person A | Show speech or reaction | Eyeline and looking space remain coherent |
| Person B | Complete the exchange | Complementary screen direction and eye height |
| Insert or cutaway | Reveal a detail or support an edit | Action and object position match the scene |
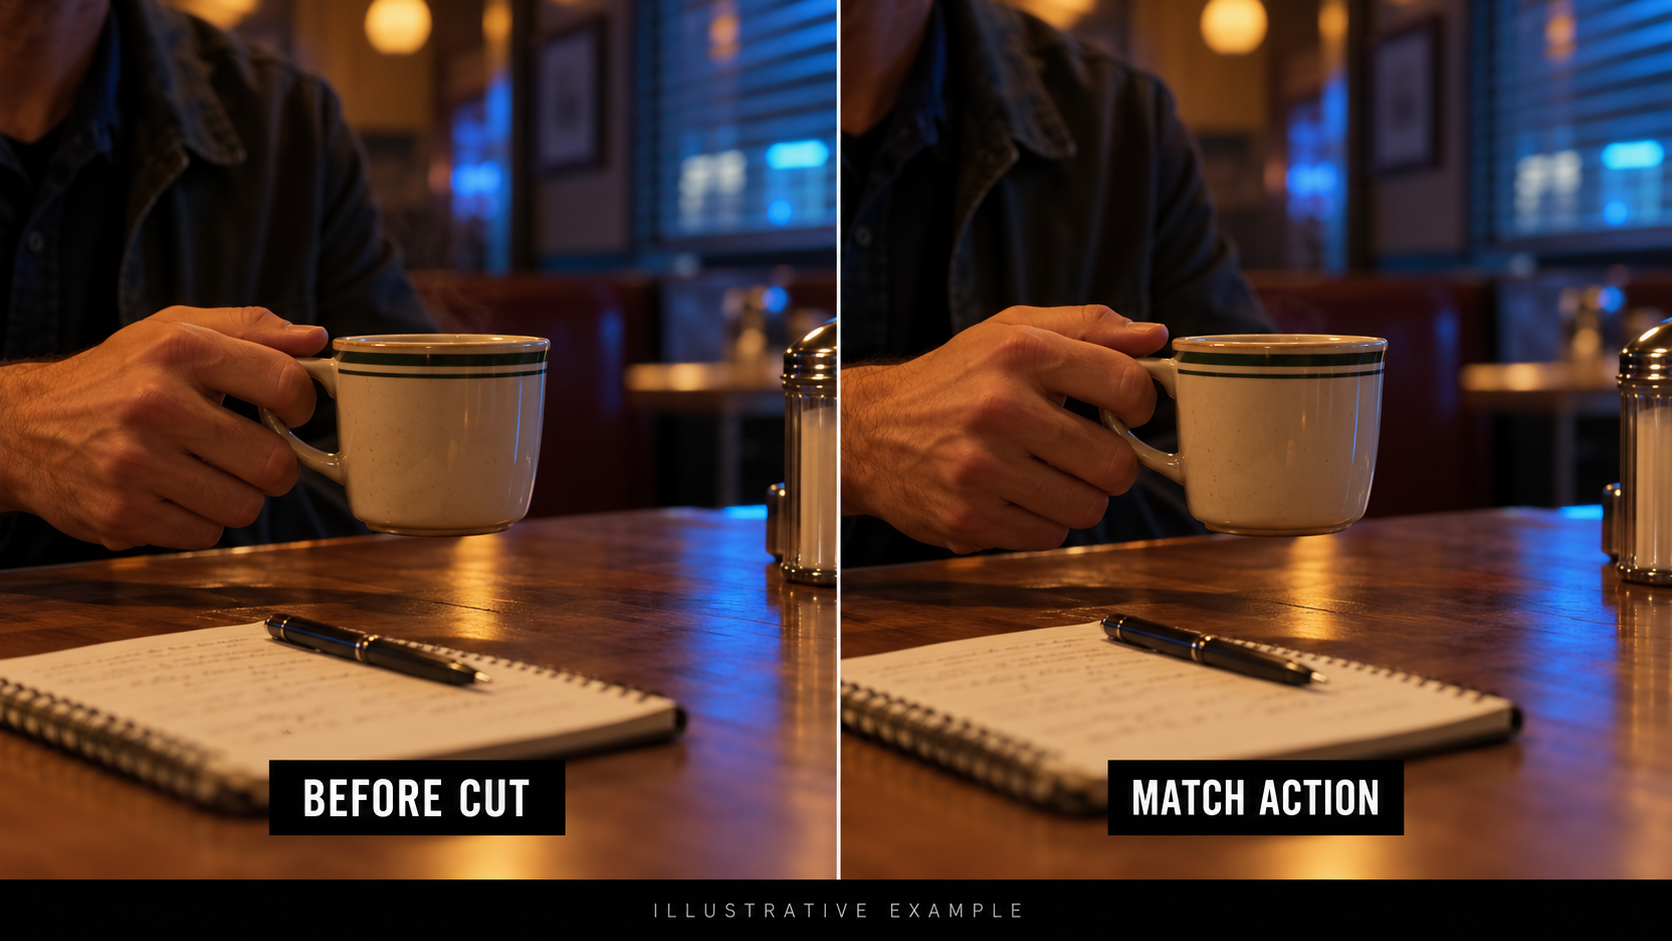
Record continuity notes that an editor can use
Track the state of important objects. Which hand holds the cup? Is the notebook open? Where is the phone? A cut can feel wrong when those details change abruptly between takes.
Track the timing of actions too. A cup raised during one line in the wide shot and during a different line in the close shot creates a choice the editor must manage. Rehearse simple actions and note where they occur.
Do not chase perfect repetition at the expense of believable performances. Focus on the actions that visibly affect cuts. A small change in an unnoticed background detail may be less important than a strong emotional reaction.
Record a few seconds before and after the important action so the editor has room to choose the cut. Leave natural pauses when appropriate. If every take starts exactly at the first word and stops at the last, transitions become unnecessarily difficult.
Keep a brief take note: the shot, take number, useful performance and any problem. “B close, take 3: best reaction; cup starts in left hand” is more useful than “good take.”
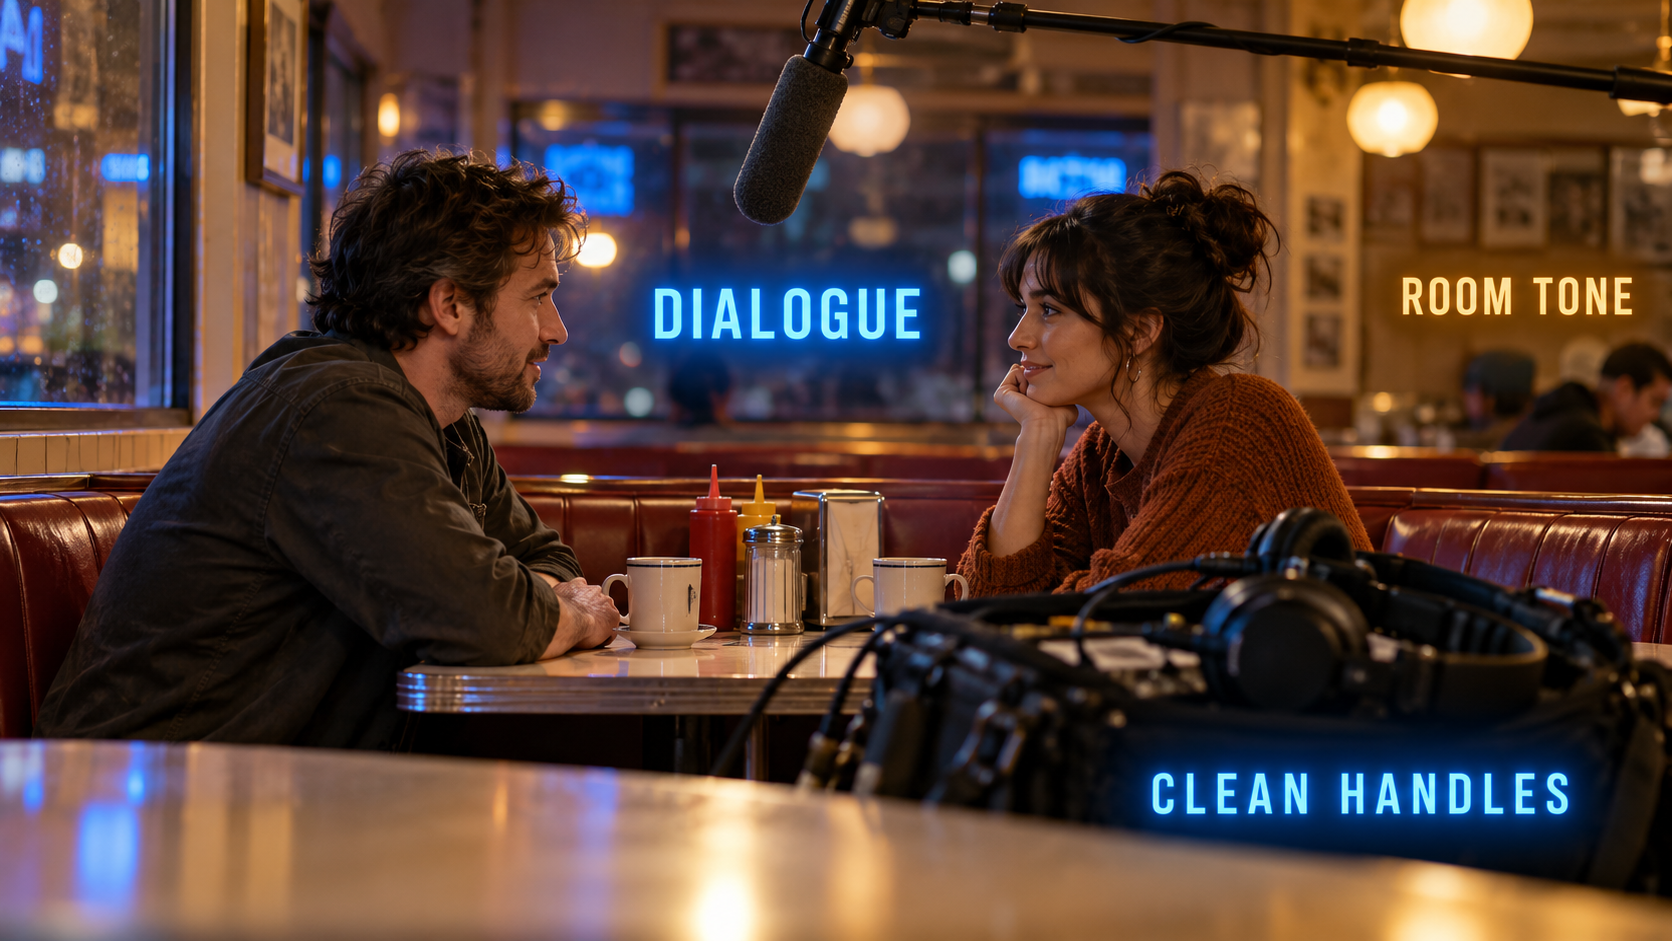
Keep exposure and sound consistent between angles
When moving the camera, check whether a window or practical lamp has become visible in the background. The subject may be well exposed while the reverse angle has distracting clipping or a completely different color balance.
Keep white balance deliberate, and record a reference if the setup changes. Lighting can support different moods for each person, but an unintended color shift between every line is usually distracting.
Plan microphone placement before the first take. A camera move may change the quality of a camera-mounted microphone, while a boom position may need adjusting to stay out of the new frame. Listen to the recording after the move.
Do not rely on music to repair unclear speech. Record a short sample, listen with headphones and check for room noise or clothing interference. If using separate audio, follow a consistent synchronization process and record a clear reference sound when appropriate.
Pixanded’s microphone comparison helps you choose a suitable approach. The best microphone for the scene is the one you can position and operate reliably without disrupting the conversation.
A one-camera exercise you can finish in an afternoon
Write a 30–60 second fictional exchange with a clear change in intention. Keep the dialogue simple enough that the actors can repeat it. Give them one visible action, such as closing a notebook after a difficult answer.
Draw a top-down sketch showing both people, the axis and three camera positions on the chosen side. Label the two-person shot, A’s view and B’s view. This is a planning exercise; the exact camera distance depends on the room and framing.
Record the full scene in the two-person shot. Then record the full exchange from A’s angle while B delivers the off-camera lines from the correct position. Repeat for B’s angle. Finally, record the meaningful insert and a short sample of the room’s background sound.
Before leaving the setup, make a rough review of the clips. Confirm that both close views have complementary looking directions, important actions can connect and the audio is usable. Finding a missing reaction while the actors are still present is much easier than discovering it after packing up.
Edit a short version that begins with the two-person view, moves closer when the emotional beat changes and uses a reaction when listening matters. Do not cut automatically after every line. Try a second version with fewer cuts and compare which one makes the exchange easier to follow.
Pixanded’s DaVinci Resolve beginner workflow can help you assemble the practice scene. Keep the first exercise simple enough that editing reveals coverage decisions instead of becoming a software troubleshooting session.
What if you need to cross the line?
Sometimes the scene changes: a person walks around the table, a new person enters or the camera follows an action. The established axis may need to change as well.
Show that change clearly. A wider view can re-establish the geography, or a continuous camera move can let the audience see the transition. A cutaway may provide breathing room, but it does not automatically explain every contradictory position.
Filmmakers Academy’s camera composition lesson treats the guideline as a tool for maintaining spatial continuity. That leaves room for deliberate exceptions. For a first exercise, master the clear version before choosing disorientation as an effect.
The useful question is not whether a diagram says a position is forbidden. It is whether the edited scene communicates the relationship you intended.
Troubleshoot the cut, not just the individual shot
| Editing problem | Check | Useful response |
| Both people seem to look the same way | Axis and camera positions | Use coherent coverage or a clear re-establishing shot |
| Gaze looks too high or low | Off-camera actor and camera height | Adjust the eyeline before another take |
| Cup or notebook jumps | Object state and action timing | Choose compatible takes or a meaningful insert |
| Reverse angle feels like another room | Background, exposure and color | Match the scene’s visual relationship deliberately |
| Dialogue feels rushed | Handles, pauses and reaction coverage | Let the listener remain on screen where useful |
| Cut is clear but emotionally flat | Shot choice and timing | Cut on a change in attention or intention |
Plan the conversation as a sequence of changes
Before shooting, divide the exchange into three or four beats. A beat is a change in what a person knows, wants or does. In our fictional cafe exercise, A announces that they are leaving; B asks a question; A hesitates; B places a notebook on the table. Those events give the editor a reason to change the view. Write them as actions rather than instructions such as “make this cinematic.”
For each beat, decide whose response matters. The person speaking does not automatically deserve the closer shot. A brief hold on B after A’s announcement might reveal the problem more clearly than another angle of A. Ask the volunteers to play the whole exchange at a comfortable pace before discussing shot sizes. Observe where their attention shifts and when an object becomes important.
Make a short coverage list with a purpose beside each shot. “Medium of A” is less useful than “A explains the decision; leave room for a glance toward the exit.” A purposeful list helps you recognize whether a take contains the needed moment. It also prevents a common beginner habit: collecting several attractive angles but missing the reaction that connects them.
Keep the exercise manageable. Two seated people, one prop and a conversation lasting less than a minute are enough. A complicated moving scene adds continuity problems before you have learned to assess a simple cut. You can increase complexity after the first sequence works.
Set matching singles without treating them as identical pictures
Complementary singles should feel as though they belong to the same conversation. Begin with the camera at a comparable height, use similar framing around each person’s head, and leave space in the direction they look. If A looks toward the right edge of their frame, B usually looks toward the left in the matching view when both cameras remain on the planned side of the axis.
The two backgrounds do not need to be symmetrical. One person might sit near a window and the other near a wall. Your job is to preserve understandable geography while controlling distractions. Look for a bright object behind one head, a line crossing a face or an accidental difference in headroom. Correct these before recording the full take.
Mark the chair and tripod positions with removable tape where the location permits it. Record the lens setting and approximate camera height in your notes. If you return after moving the camera, these records help restore the relationship. A quick reference photograph can be more useful than trying to remember the distance between every item.
Eyelines deserve their own rehearsal. When filming A’s single, keep B near the position established in the wider shot. Moving B next to the camera merely to make them convenient can change A’s gaze. Have A look at B, then review the frame. Adjust intentionally if the gaze feels too close to the lens or too far away. The intended relationship matters more than following a fixed distance rule.
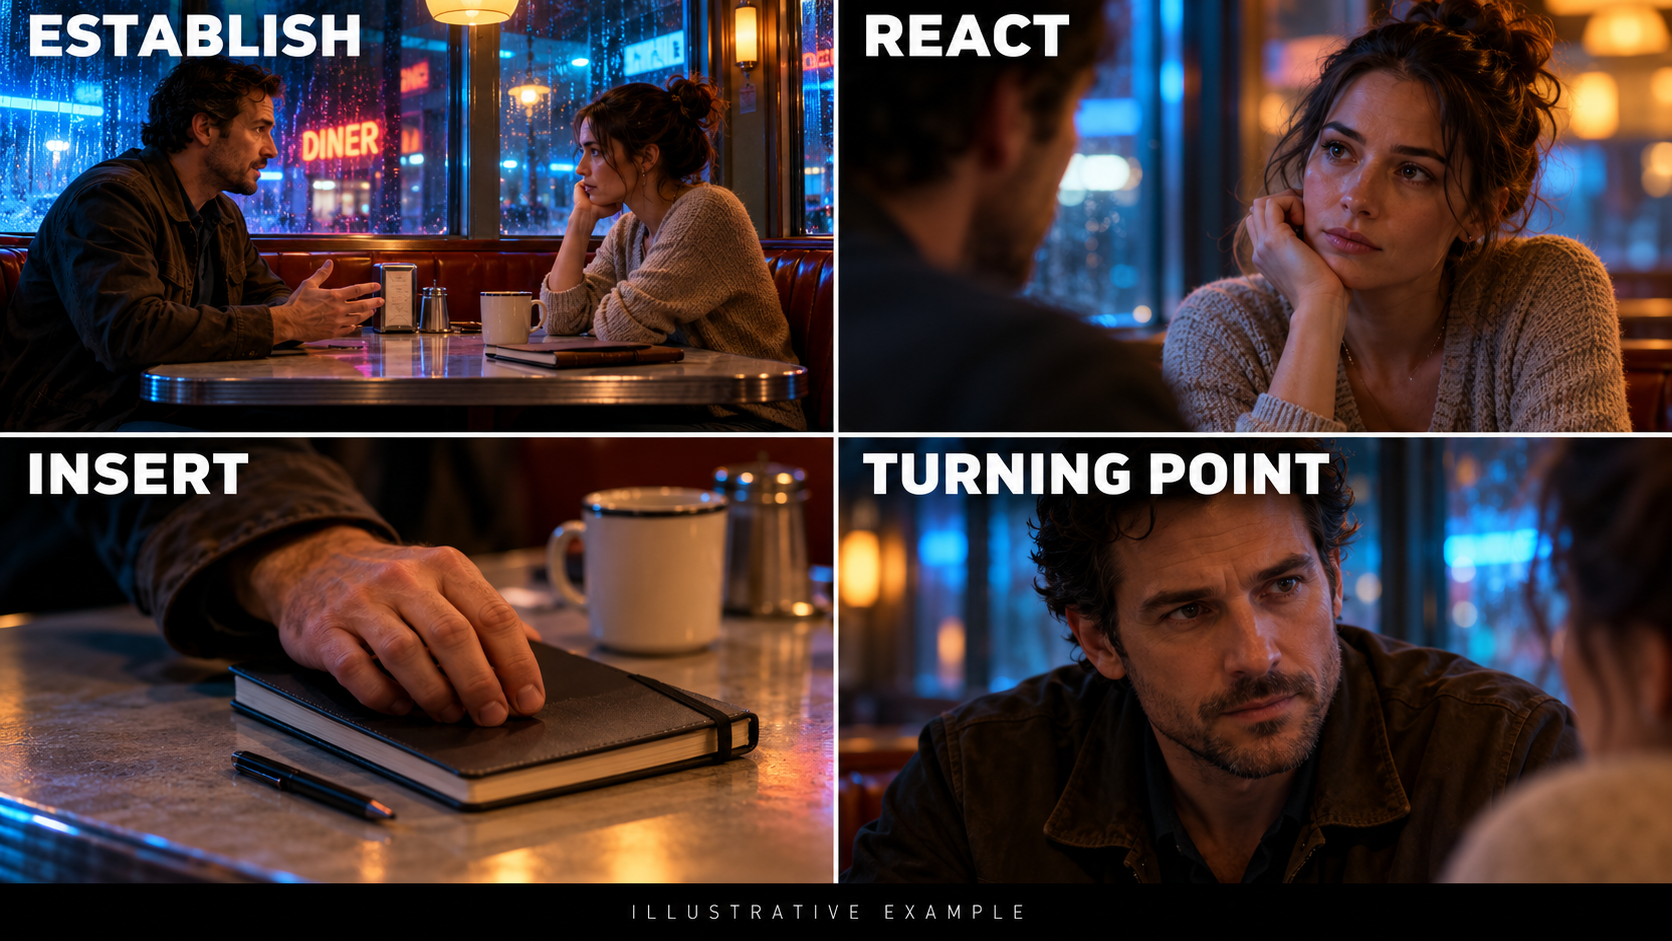
Build an edit that follows attention
Start the first edit with the simplest usable material. Establish the pair, stay with an uninterrupted exchange long enough to understand it, and cut closer when the meaning changes. Do not add music, elaborate transitions or color treatments while you are still diagnosing coverage. Those additions can conceal the reason a sequence feels awkward.
Listen before choosing the cut point. Try letting a person’s next line begin while the previous shot is still visible. Then try showing a listener’s reaction while the speaker continues. These are common split-edit approaches, often called J-cuts and L-cuts, but the name is less important than the result: picture and sound can lead the viewer’s attention at different moments.
Treat the sound as a continuous scene. A change in room noise at every angle can make otherwise compatible shots feel disconnected. Review the quiet spaces between words and compare the microphone distance across takes. Preserve a little time before and after each line so you have editing room. Record room tone without conversation when the location is quiet enough; it gives you an additional matching resource rather than guaranteeing a seamless repair.
Now compare two versions. In the first, cut mainly when the speaker changes. In the second, cut at the important reactions and decisions. Watch both without looking at the timeline. Describe what becomes clearer or weaker. Do not assign a numerical score to an unmeasured improvement; name the moment and explain why the chosen view helps.
Check action continuity at the actual cut
A prop does not have to remain frozen throughout the scene. It has to make sense across the views you combine. If A starts lifting the cup in the wide shot and completes the action in a single, compare the hand, cup direction and timing. A change of angle can hide small differences, but a cup that jumps from table to mouth can draw attention away from the dialogue.
Ask for one repeatable action rather than choreographing every finger. For example, A touches the handle, pauses, then lifts the cup after a particular line. Put that cue in the continuity notes. Before each new angle, reset the cup position and liquid level sufficiently to preserve the intended sequence. Check these resets with the volunteers so the action remains natural.
An insert can help when it communicates something and belongs to the scene. A notebook opening can bridge a change in shot size if the notebook matters to the conversation. It is less convincing when it appears only to hide a mistake and contradicts the surrounding action. Record inserts at the same stage of the action, with consistent lighting and the correct hands.
Before ending the session, make a rough assembly if you can. Check that you have an entrance to the scene, its turning point and an ending. Review the strongest takes for usable sound and focus. A missing final reaction is easier to record while the actors and set are still available than to invent during editing.
Finish with a simple scene log
Your log needs the shot name, usable take numbers, action resets and any audio concern. Note why a take is useful: “B’s pause reads clearly” gives the editor more information than “good take.” Save the log beside the media and keep the original filenames traceable. At the next practice session, change one factor—standing actors, a second prop or a moving camera—so you can identify what new planning it requires.
Frequently asked questions
Do I need two cameras?
No. One camera can cover a repeatable fictional scene from several positions. For an unscripted conversation, multiple cameras may preserve simultaneous moments, but they still need a coherent position plan.
Must every shot be over the shoulder?
No. Clean single shots can work well. An over-the-shoulder view is useful when the foreground person strengthens the relationship, but it should not obscure the expression you need.
Should I cut to whoever is speaking?
Not automatically. A listener’s reaction may carry the scene. Choose the shot that communicates the important change, whether that happens in speech, silence or an action.
Is crossing the axis always a mistake?
No. It can be deliberate or clearly shown through movement and re-establishment. An unexplained reversal is harder to read, so begin with consistent geography while learning.
Can I practice with a phone?
Yes. Use stable framing, deliberate exposure and usable sound. The exercise teaches planning and editing relationships, which do not depend on owning a cinema camera.
Film a conversation with one clear turning point
Plan the axis, record a usable two-person view, capture both people’s speech and reactions, and preserve the important actions between takes. Then make two short edits with different cut timing. The version that communicates the scene clearly is the useful result—not the one with the largest number of camera angles.